The simplest oauth2 server in 120 lines : Google Spreadsheet and App Script
Why ?
6 months ago, we published Why you shoud (or must) use "Sign in with..." button. Many people asks me how oauth2 (and openid connect) works.
The best explaination is (for us) a real and a complete example. Open keycloak sources ? Hum... Step by step, we will make our own server. It is the minimal implementation, never use it with a production project of course.
Tools
We really enjoy Google tools, sometimes it is a great way to implements POC or examples.
For this project, we will use :
- Spreadsheet as a database : it is a universal and visual tool.
- App Script : We will build a REST API using the Google Scripting tool
- HTML form
- Postman as a oauth2 client
Example available for all :
- Spreadsheet used as a mini database
- All code
- Auth URL : https://script.google.com/macros/s/AKfycbx3xQrLrP0CJ9TAE13ryx5E_f-DfeFeNG8HhLls/exec?operation=auth
- Access Token URL : https://script.google.com/macros/s/AKfycbx3xQrLrP0CJ9TAE13ryx5E_f-DfeFeNG8HhLls/exec?operation=token
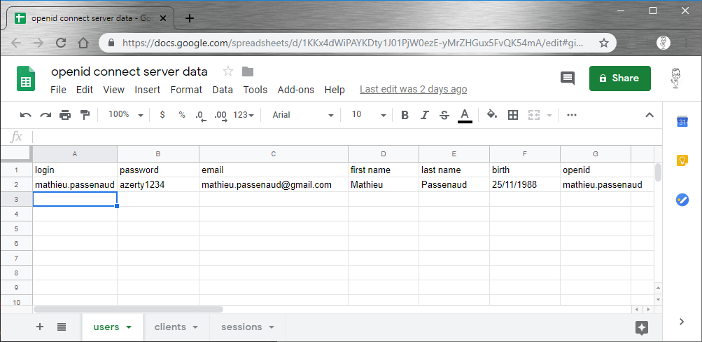
Data structure
A users table. You can add as many columns as you want. Each column will become a scope. Passwords are not encoded or encrypted, this is not the subject for this publication.
- login
- password
- first name
- last name
- birth
- openid
- [...]
A clients table. Each application as a oauth2 client need to authenticate itself. In this table, we will store clients informations. As the same for users, we will not use the client secret. Our oauth2 client will operate as a public client.
- client id
- client secret
- redirect uris
A session sheet. It will be used as a cache for active sessions. Removing a line corresponds to a session kill. No session timeout is implemented here, to keep the server as simple as I can.
- client_id
- login
- session
- scopes
- token
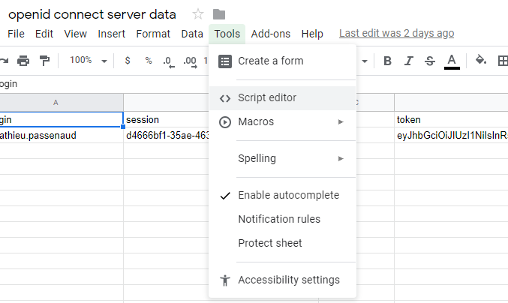
Prepare script editor
Open a new Spreadsheet, click on "Tools" ans "Script editor" :
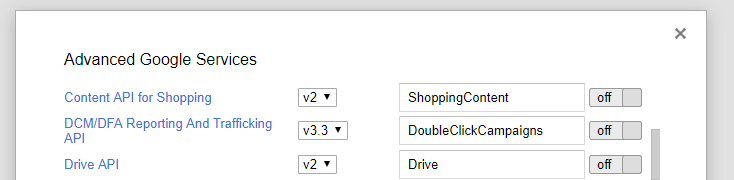
Add Google drive API access to your script with "Resources" and "Advanced Google Services"
A login screen may appear. After login, a warning message about unverified application is displayed. It is totally normal and of course, you will agree with your own script.
Now we are ready to go.
HTML pages with Google App Script
There is some little and tricky tips about HTML in Google App Script. First of all, a HTML file is returned, directly with the code or loaded from a file, using HtmlService.
You can have a template with some tags in your HTML file. Then, before returning the file you can load it as a template and complete it with some variables.
<input type="hidden" name="client_id" class="form-control form-control-lg" placeholder="client_id" value="<?= client_id ?>">
In your script :
                    var template = HtmlService.createTemplateFromFile("html_file_name");
                    template.client_id = request.parameter.client_id;
                    return template.evaluate();
Because HTML files are included in an iframe, you can not POST a form directly. You have to call a custom function in the script, here "processForm". So, we have to disable form submit :
                        <script>
                            function handleFormSubmit(formObject) {
                                google.script.run.withSuccessHandler(callback).processForm(formObject);
                            }
                            function callback(data){

                            }
                        </script>
                    function processForm(formObject) {
                        formObject.formid;
                        return "value";
                      }
Login screen
When you use a "sign in with..." button, the login screen comes from the provider. We have to implement our. Select "file", "new", "HTML file" and build your own login screen with the following constraints :
A single HTML file with all stuff in. Here a simple example :
                            <form id="loginForm" class="form-signin" onsubmit="handleFormSubmit(this)" >
                                <h1 class="h1 mb-3 font-weight-normal">Sign in</h1>
                                <label for="inputLogin" class="sr-only">Login</label>
                                <input type="text" id="inputLogin" name="login" class="form-control form-control-lg" placeholder="Login" required autofocus>
                                <label for="inputPassword" class="sr-only">Password</label>
                                <input type="password" id="inputPassword" name="password" class="form-control form-control-lg" placeholder="Password" required>
                                <input type="hidden" name="client_id" class="form-control form-control-lg" placeholder="client_id" value="<?= client_id ?>">
                                <input type="hidden" name="scope" class="form-control form-control-lg" value="<?= scope ?>">
                                This app will have access to <?= scope ?>
                                <input type="hidden" name="redirect_uri" class="form-control form-control-lg" value="<?= redirect_uri ?>">
                                <button class="btn btn-lg btn-primary btn-block" type="submit">Sign in</button>
                            </form>
In this environment, we can not submit forms directly. So, we call a "processForm" function which retreives form fields :
                        <script>
                            // Prevent forms from submitting.
                            function preventFormSubmit() {
                                var forms = document.querySelectorAll('form');
                                for (var i = 0; i < forms.length; i++) {
                                forms[i].addEventListener('submit', function(event) {
                                    event.preventDefault();
                                });
                                }
                            }
                            window.addEventListener('load', preventFormSubmit);
                            function handleFormSubmit(formObject) {
                                google.script.run.withSuccessHandler(update).processForm(formObject);
                            }
                            function update(redirectUri){
                                if(redirectUri == "error"){
                                    return;
                                }else{
                                    window.top.location.href=redirectUri;
                                }
                            }
                        </script>
This is mine (only with bootstrap and a little customization) :
Login process
Auth endpoint
An oauth2 client will make it first GET request to a /auth endpoint on the oauth2 server declared. If all parameters are OK, the oauth2 server will show a login form. In our example, to have a single file for all operations, we declare a auth endpoint with "?operation=auth"
The auth endpoint needs :
- client_id : this is the application id declared in our "clients" sheet. This is an identification of the application.
- scope : all wanted scopes in the token. A scope is a user information contained in the users database.
- redirect_uri : where the client is waiting for a callback. This URI must be declared in the client list and is an important part of the oauth2 security. Please declare redirect uris without any wildcard if you can.
                    function doGet(request){
                        // detect auth operation.
                        if(request.parameter.operation == "auth"){
                          var template = HtmlService.createTemplateFromFile("login");
                          template.client_id = request.parameter.client_id;
                          // show scopes in the login form, as a consent screen to inform the users about personnal data retreived by the app.
                          template.scope = request.parameter.scope;
                          template.redirect_uri = request.parameter.redirect_uri;
                          if(verifyClientIdRedirectURI(request.parameter.client_id, request.parameter.redirect_uri))
                            return template.evaluate();
                          else
                            return HtmlService.createHtmlOutputFromFile("<body><h1>Error in client</h1></body>");
                        }
                      }
And a verifyClientIdRedirectURI function :
                    function verifyClientIdRedirectURI(client_id, redirect_uri){
                        // retreive the google sheet with the id. We have declared the sheetID as a global variable.
                        var sheet = SpreadsheetApp.openById(sheetID).getSheetByName("clients");
                        var data = sheet.getDataRange().getValues();
                        // search for a client_id and redirect_uri couple, if exists return true. false if not
                        for(var i = 0; i<data.length;i++){
                          if(data[i][0] == client_id && data[i][2] == redirect_uri)
                            return true;
                        }
                        return false;
                      }
Now we have the first part. A client identification with a client_id and redirect_uri couple.
Deploy
Click on "publish" and "deploy as a webapp...". Do not forget to select "Anyone, even anonymous" in the "Who has access to the app:" section.
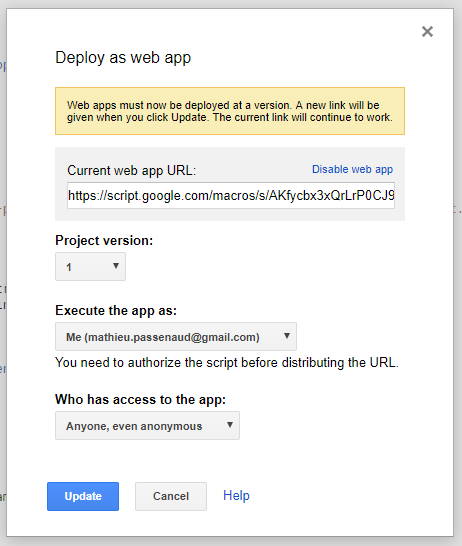
Retreive the web app URL.
First test
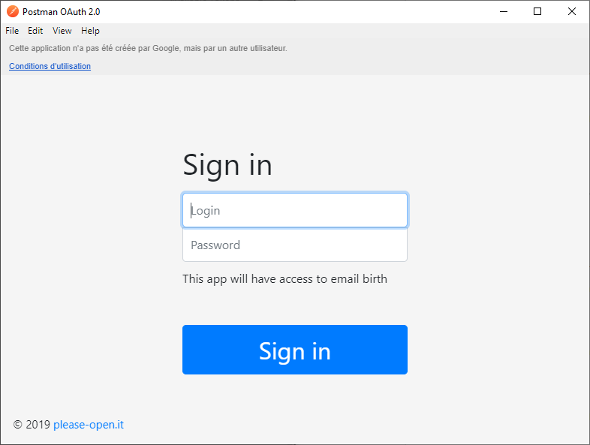
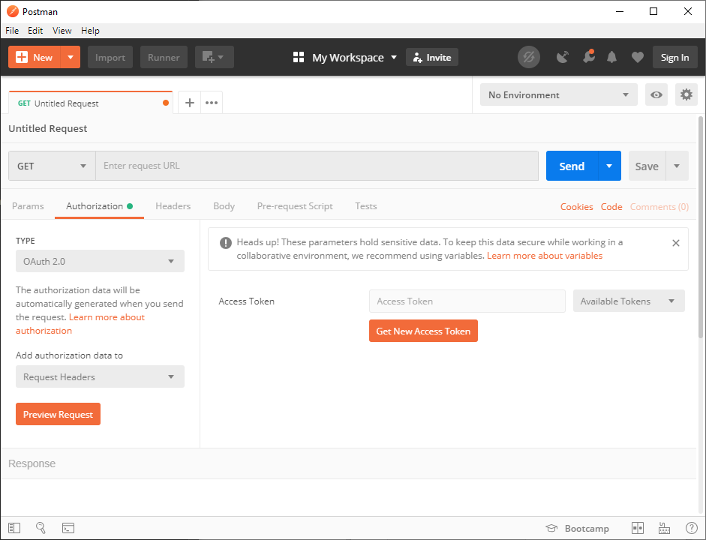
Download and install Postman if you do not have it. It is the greatest tool for a backend developer to test (and to deliver) REST Apis. It has a simple Oauth2 client.
Create a new request, do not enter an URL. In "authorization" tab, select "Oauth2" type. Now we are able to configure an oauth2 client. Click on "Get New Access Token"
In the "auth URL" field, enter your webapp URL and add "?operation=auth" at the end. Enter a client ID and a redirect URI. Your redirect URI must start with "127.0.0.1" because Postman will operate like a web server to retreive the session id returned by the oauth2 server (see bellow). Also give a client ID. Those informations are in the "clients" sheet.
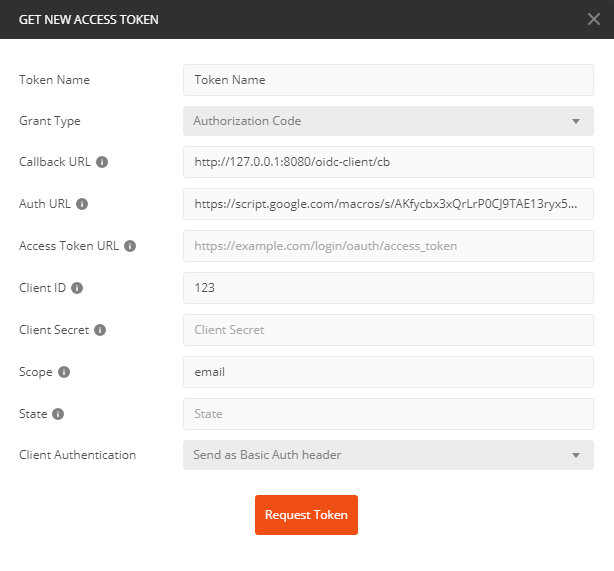
Click on "request token", a new window appear with your login form (if all parameters are correct).
Authorization code
When the form is sumitted, the first step is to verify login and password provided by the user. As we did for the client id/redirect uri, we search in the sheet a couple of username/password.
                    function verifyLoginPassword(login, password){
                        var sheet = SpreadsheetApp.openById(sheetID).getSheetByName("users");
                        var data = sheet.getDataRange().getValues();
                        for(var i = 0; i<data.length;i++){
                          if(data[i][0] == login && data[i][1] == password)
                            return true;
                        }
                        return false;
                      }
Then, we will need to create a unique ID (UUID) for the session. This ID is called "authorization_code". This code will be sent to the client using a redirect.
                    function createSession(client_id, login, scope){
                        var sheet = SpreadsheetApp.openById(sheetID).getSheetByName("sessions");
                        var code = Utilities.getUuid();
                        sheet.appendRow([client_id, login, code, scope]);
                        return code;
                      }
Now we have a session in the "sessions" sheet, corresponding to the user.
To return an authorization_code, we will use a "redirect_uri". We saw that this URI corresponds to an endpoint in the client app. With this endpoint, the client app is able to get this code.
So in our login form, in the callback of "processForm", we will simply do : window.top.location.href=redirectUri;
This action will redirect the user to his application, with the code. Great !
In the login template :
                    // Prevent forms from submitting.
                    function preventFormSubmit() {
                      var forms = document.querySelectorAll('form');
                      for (var i = 0; i < forms.length; i++) {
                        forms[i].addEventListener('submit', function(event) {
                          event.preventDefault();
                        });
                      }
                    }
                    window.addEventListener('load', preventFormSubmit);

                    function handleFormSubmit(formObject) {
                      google.script.run.withSuccessHandler(update).processForm(formObject);
                    }

                    function update(redirectUri){
                      if(redirectUri == "error"){
                        $("#badCredentials").show();
                        return;
                      }else{
                        window.top.location.href=redirectUri;
                      }
                    }
A "processForm" function in the Google Script :
                    function processForm(formObject) {
                        if(verifyLoginPassword(formObject.login, formObject.password))
                          return formObject.redirect_uri+"?code="+createSession(formObject.client_id, formObject.login, formObject.scope);
                        else
                          return "error";
                      }
Next step : build a new token from the session.
JSON Web Token
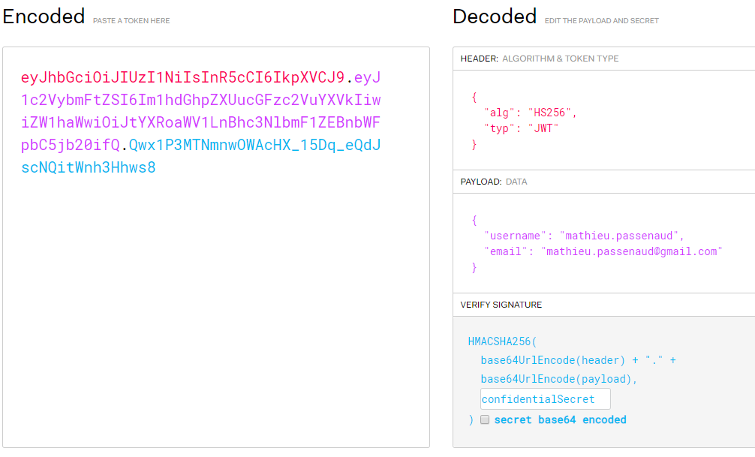
JSON Web Token (JWT) are not directly a part of oauth2. It is a good practice to use them as a security for user informations, indeed a JWT token contains a signature.
At auth0 they built a JWT deserializer : https://jwt.io. Keep this website in your favorites !
A JWT token is composed with :
- A header with the type and the hash algorithm
- A payload of data
- A signature
With only simple libraries (base64 encoder and signature algorithms) we can easily build our JWT token (our private key is : "confidentialSecret") :
                    function computeAccessToken(data){
                        var header = {
                          "alg": "HS256",
                          "typ": "JWT"
                        };
                        var encodedHeader = Utilities.base64EncodeWebSafe(JSON.stringify(header));
                        var encodedData = Utilities.base64EncodeWebSafe(JSON.stringify(data));
                        var token = encodedHeader + "." + encodedData;

                        var secret = "confidentialSecret";
                        var signature = Utilities.computeHmacSha256Signature(token, secret)

                        signature =  Utilities.base64EncodeWebSafe(signature);
                        var signedToken = token + "." + signature;
                        return signedToken;
                      }
A great documentation is available here : https://www.jonathan-petitcolas.com/2014/11/27/creating-json-web-token-in-javascript.html
Retreive a token
Previously, the client got an authorization_code which is a simple UUID. Next step, the client makes a POST request to an "access token" endpoint, with the authorization_code. If the code is still correct, the oauth2 server builds a JWT token with all needed informations (akka scopes) and sign it with a private key.
Endpoint
First of all, we listen for a POST request on "token" operation :
                    function doPost(request){
                        if(request.parameter.operation == "token"){
                          if(verifyClientIdRedirectURI(request.parameter.client_id, request.parameter.redirect_uri))
                            return ContentService.createTextOutput(JSON.stringify({'access_token': createAccessToken(request.parameter.client_id, request.parameter.code) } ) )
                                .setMimeType(ContentService.MimeType.JSON);
                        }
                      }
Create an access token
We get all informations in our mini database depending on the scopes needed by the client. Before that, a simple verification with the session is made
                    function createAccessToken(client_id, code){
                        var sheet = SpreadsheetApp.openById(sheetID).getSheetByName("sessions");
                        var data = sheet.getDataRange().getValues();
                        for(var i = 0; i<data.length;i++){
                          if(data[i][0] ==  client_id && data[i][2] == code){
                            var login = data[i][1];
                            var scopes = data[i][3].split(' ');
                            var data = {
                              "username": login
                            };
                            for(var scope in scopes)
                              data[scopes[scope]] = getUserInfo(login, scopes[scope]);
                            var authorize_code = computeAccessToken(data);
                            sheet.getRange(i+1, 5).setValue(authorize_code);
                            return authorize_code;
                          }
                        }
                        return "";
                      }
This function builds a user structure like :
                {
                    username: "mathieu.passenaud",
                    firstName: "Mathieu",
                    lastName: "Passenaud"

                }
After that, a token is generated with "computeAccessToken" and serialized in the "session" sheet.
Final test
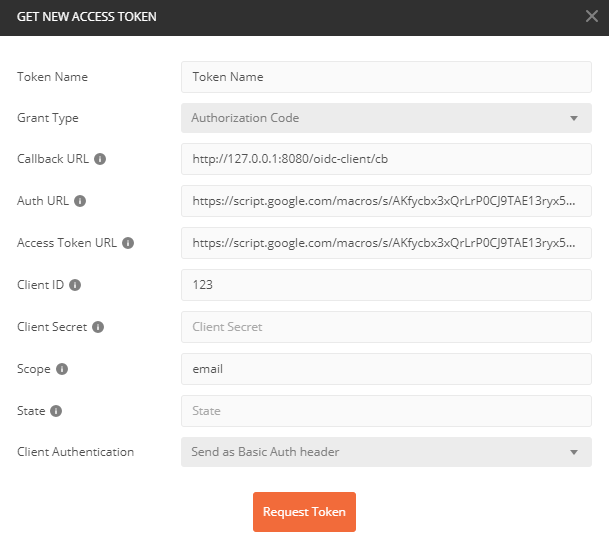
Go back to postman. Add an "access Token URL" with the script URL and "?operation=token" at the end. Add your scopes, depending on informations you have in the "users" sheet.
Click on "Request Token". The login form is shown :
Add user credentials, validate the form. Postman will get an authorization then another request will get an access token
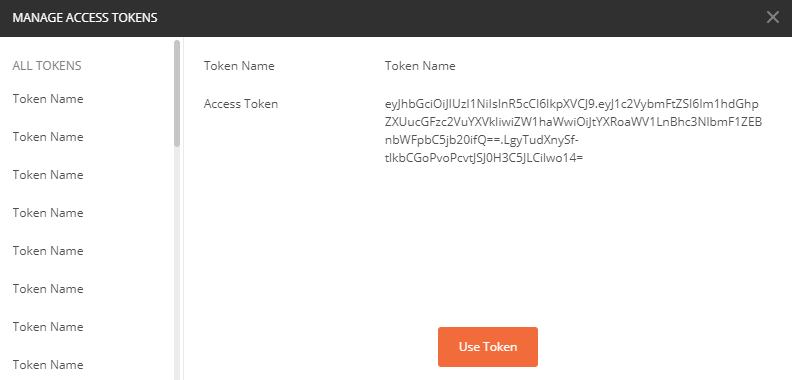
The access token is here ! YES ! Verification with jwt decoder :
That's exactly the login process. When you use any "login with..." button, the magic behind it is simple like that, and so strong by design.
Many other endpoinds are needed for token validation, session timeout and session revocation of course. As a developer, you perfectly know how it is done.